Install WordPress on the Synology Disk Station
Introduction
This blog is running on green.ch, not on my Synology Diskstation. I use the Disk Station for private data hosting, which doesn’t mix well with a publicly accessible blog, for various reasons:
- I might turn off the Synology (at night, need to cut power in the building etc.)
- I want to focus the security settings of the Synology around my personal needs (firewall everything except the ports / services that I need personally)
- The hardware is geared towards my personal needs (e.g. the amount of RAM in the Disk Station).
Nevertheless, I did want to explore how WordPress (and a number of other services) perform on a Synology Diskstation. I might switch from green.ch to a Synology in the future, but I would use a dedicated machine for this purpose (e.g. the new DS619slim).
Why Docker?
WordPress and MySQL are available as «native» Synology applications in the packet manager. There is nothing wrong with these packages. I did try them out, and WordPress worked fine. If I had a Synology dedicated as a web server, then I would probably use these packages. As it is, I was only experimenting with WordPress on my private Synology workstation, containing my private data.
Therefore I wanted a solution with a minimal amount of risk. In Docker, if an attacker knows of a zero day exploit to break out of WordPress, then s/he would land in the Docker environment. Another exploit would be necessary to also break out of the Docker environment and access more of the Synology. I declared this to be «secure enough» for a trial run.
Plus, I wanted to learn about Docker anyway. Once you have a working Docker image, it can be deployed on many cloud services.
Note that Docker is not a virtual machine, and is therefore less secure compared to e.g. the Docker Virtual Machine Manager. If you are really paranoid security conscious, then run a virtual DSM, and on this virtual Synology run the Docker package.
Installing Docker
Go to the packer manager and install Docker, it’s that simple.
Enable SSH
The Synology GUI for Docker is great for supervising the Docker environment. One can easily see the running images, how much RAM and CPU they use etc. To actually define docker containers, I prefer to use declarative files, based on the Docker Compose solution (https://docs.docker.com/compose/).
The files can be edited with any text editor (I use UltraEdit on my Mac), but for starting/stopping the containers one needs a command line on the Synology. Therefore, SSH needs to be enabled.
Check the Synology documentation for instructions on how to do this.
Image Definition
After installing Docker, a new share gets created named «docker». On this share, I create a directory «wordpress». Place the definition file «docker-compose.yaml» into this directory. This is the file content:
version:  "3"

services:
  db:
    image: mysql:5
    container_name: wordpress_db
    volumes:
      - db_data:/var/lib/mysql
    restart: always
    environment:
      MYSQL_ROOT_PASSWORD: myRootPwd
      MYSQL_DATABASE: wordpress
      MYSQL_USER: wordpress
      MYSQL_PASSWORD: MyWpPwd

  wordpress:
    depends_on:
      - db
    image: wordpress:latest
    container_name: wordpress
    ports:
      - "31080:80"
    volumes:
      - wp_data:/var/www/html/wp-content
    restart: always
    environment:
      WORDPRESS_DB_HOST: db:3306
      WORDPRESS_DB_NAME: wordpress
      WORDPRESS_DB_USER: wordpress
      WORDPRESS_DB_PASSWORD: MyWpPwd

volumes:
  db_data:
  wp_data:
Start WordPress
SSH into the Synology. Then, change into the WordPress directory, e.g. cd /volume1/docker/wordpress. The command to start the image is sudo docker-compose up -d. That’s it, wordpress is now running. If you want to stop it, use sudo docker-compose down. If you want to stop the image and delete all data (really, everything will be gone, you will have a «factory reset» WordPress!): sudo docker-compose down --volume.
«Wire up» the Ports
First, you have to make the Synology accessible from the Internet. There are way too many possibilities to do this, so I’ll just mention the things to do summarily:
- Use a DDNS service (e.g. the one built-in to the Synology) to define a host name.
- On the router / firewall, you need to add port forwarding from ports 80/443 to 80/443 of the Synology
If you now connect to the Synology via http you will be greeted by the built in web server (the «Web Station» service of Synology). The https protocol won’t work properly at this time. What I wanted is this:
- Port 80 (http) remains on the Web Station
- Port 443 (https) goes to WordPress, and actually uses SSL.
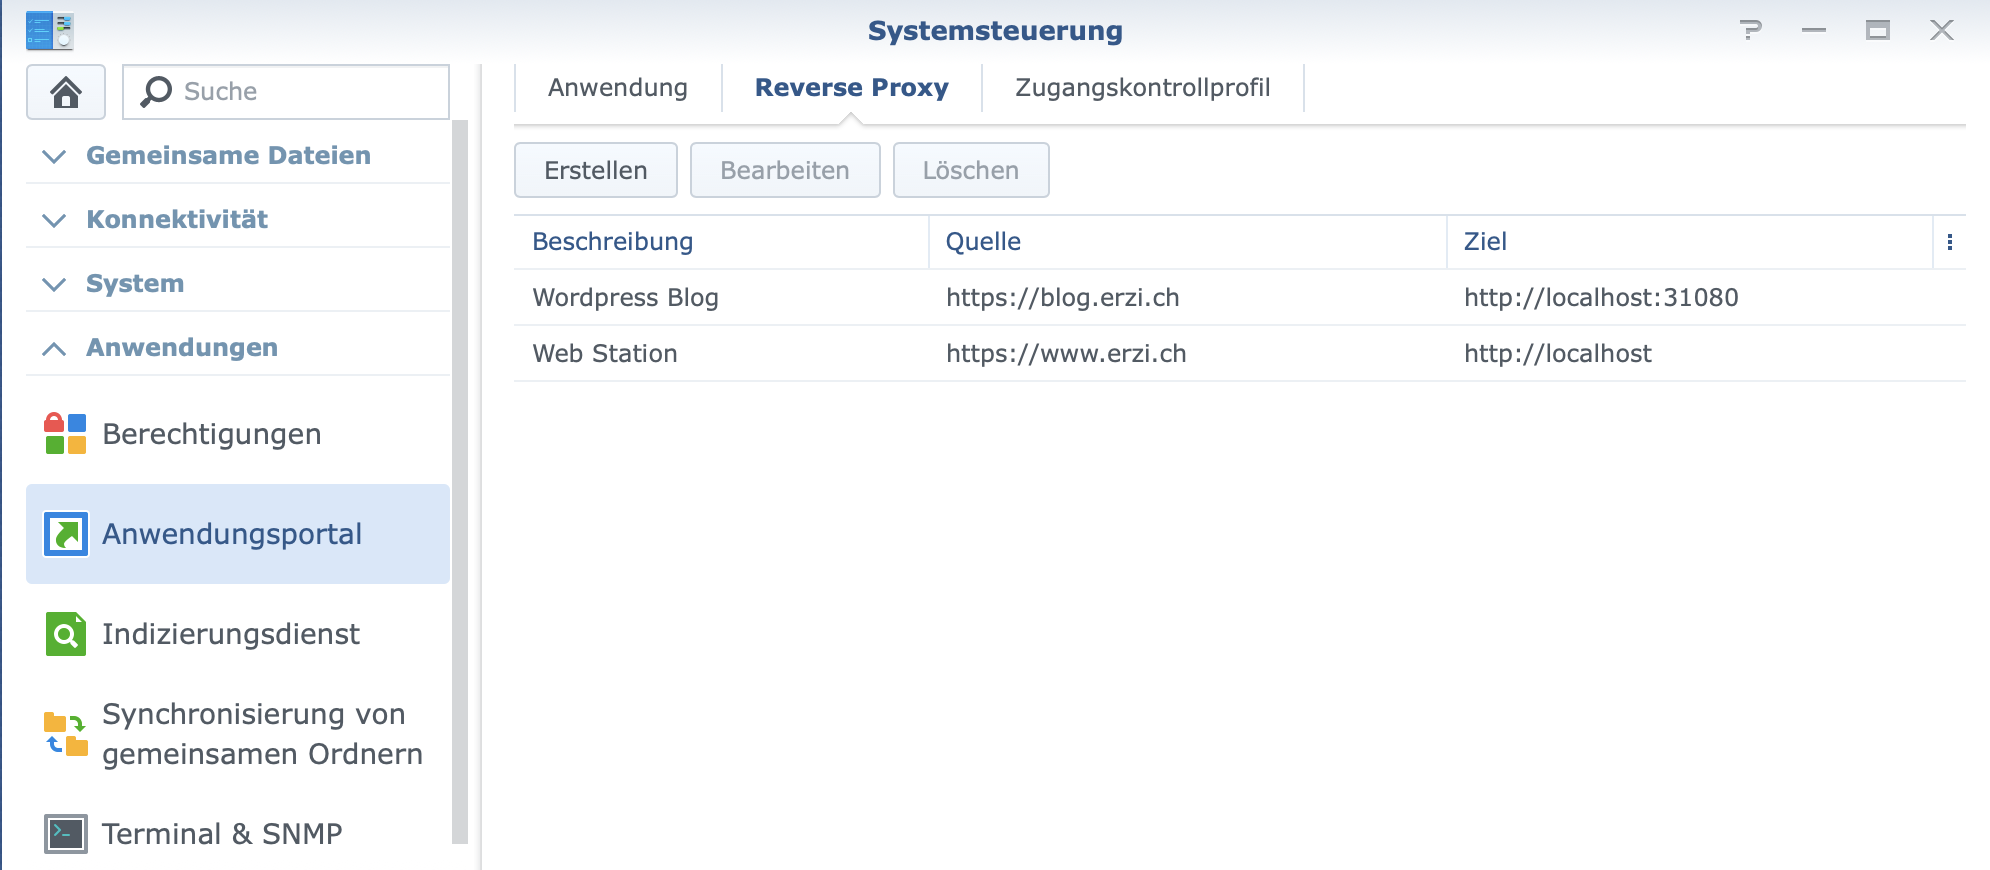
To achieve this, the Synology Reverse Proxy service is used. This is how it gets configured:
First, add the host. Target ist the port used in the docker image, in our example this is «31080». Port 80 should still ho to the Web Station, therefore it points to «localhost».
As a last step, you will need a certificate. I used the Let’s Encrypt service. There is a GUI in the Synology to order such a certificate. Look at the Synology help for details.
Install WordPress
Ue a browser and call the public address of the blog the you want to use, e.g. https://blog.erzi.ch. You should be greeted with the Synology install wizard. It should be obvious what needs to be done.
That’s it, WordPress should be running.
To Do
- E-Mail: WordPress can’t send any e-mail. You need a plugin for this, and an SMTP service that you can use.
- Backup: With the above setup, Docker manages all data volumes (they are in /volume1/@docker, by the way). If you back up your Synology, make sure that this data is included in the backup.
Alternatively, mount the volumes to directories under the docker/wordpress directory. This way, you can see all files, and backup them manually if desired. The «docker-compose.yaml» is no longer portable to another server when you do this, so weigh the advantages / disadvantages of this approach.